We at Coolbest Aircon Servicing know that mastering the aircon installation process step-by-step in Singapore requires strict compliance with 2026 building regulations.
This complete sequence covers everything from the initial site survey to the final commissioning handover. Proper techniques ensure your cooling units run efficiently for years.
Our technicians execute each phase with precision to prevent costly future water leaks or system failures. A compliant setup guarantees peak performance and safety in your home or business.
We provide this guide so you know exactly what customers are responsible for at each step.
Step 1: Site Survey (30 to 45 min, Free)
A qualified installer visits your home to evaluate your space and provide an itemised written quote based on exact room measurements.
Our survey process identifies the best mounting locations for both indoor and outdoor units. This assessment evaluates piping route complexity and checks your power supply capacity. Current Building and Construction Authority regulations dictate strict guidelines for aircon placements. We verify compliance with these rules before any physical work begins. A standard HDB condenser bracket must not exceed strict weight limits, typically capping around 80kg for the outdoor unit.
You must provide access to each room during this visit. Our team photographs the space to generate a highly accurate, fixed quote. Showing the technician your power supply panel helps prevent electrical overloads. We need to understand your daily usage patterns to recommend the perfect setup.
Information Gathered During Survey
- Area, ceiling height, and window exposure per room.
- Direct piping routes versus paths needing wall hacking.
- Dedicated circuit availability versus shared power lines.
- Approved locations for exterior brackets on HDB or condo facades.
Output: An itemised written quote specifies the BTU per room, brand recommendations, and total install cost.
Step 2: BTU Sizing + Model Selection (You Decide, 1 to 3 Days)
Based on the site survey, you receive a detailed recommendation for the required BTU per room and suitable models to choose from.
We calculate exact cooling loads to ensure maximum energy efficiency. A standard 12 to 15 square meter bedroom typically requires a 9,000 BTU unit for optimal cooling. The National Environment Agency mandates strict efficiency standards in 2026. Our technicians guide you through selecting the most effective brand for your specific layout. You choose the efficiency tier that best fits your monthly budget. Specific choices dictate your final setup and long-term running costs. We highlight that a 5-tick R32 refrigerant model can save you approximately $262 annually in electricity costs compared to older units.
Your Hardware Choices
- Specific manufacturer brands.
- Efficiency tier ratings of 3, 4, or 5 ticks.
- Single split per room versus multi-split configurations.
- Smart features like Wi-Fi control and air purification.
Zero high-pressure sales tactics exist in this phase. Our policy guarantees that if a basic 9,000 BTU unit perfectly cools your bedroom, that exact specification goes into your quote.
Step 3: Install Day 1, Trunking & Piping (4 to 6 hrs)
The first day involves laying protective covers, mapping the routes, and installing the visible white PVC trunking that houses your copper piping.
Our team routes the copper refrigerant pipes and drainage lines safely to the exterior exit. Singapore’s 2026 standards require specific materials to handle high-pressure cooling systems safely. Contractors must use appropriate specifications to avoid hazardous gas leaks. We exclusively use SWG 22 copper pipes, which feature a 0.71mm thickness. This grade easily withstands the intense operating pressures of modern R32 refrigerants. Thinner SWG 23 pipes carry a much higher risk of bursting over time. Our installers strictly avoid these inferior materials.
You must inspect the workmanship during this phase. Neat installations prevent long-term maintenance issues.
Key Workmanship Checks
- Trunking corners should feature neat, mitred joints.
- Wall penetrations must have zero visible gaps.
- Drainage pipes require a downward angle for consistent gravity flow.
- Dust from drilling must remain contained within protective sheets.
Step 4: Install Day 1 to 2, Unit Mounting
Technicians mount the indoor unit securely on a wall bracket and secure the outdoor condenser to an approved service balcony ledge or rooftop frame.
Our specialists connect the indoor and outdoor electrical systems directly to your power supply. HDB regulations heavily restrict renovation hours to minimize neighborhood disruption. Fines apply for violating these strict community noise rules. We schedule all noisy work, such as drilling and hacking, strictly between 9:00 AM and 5:00 PM on weekdays. Proper mounting techniques guarantee quiet operation. Indoor units must sit perfectly flush against the wall with a tight tolerance of just 1mm.
Key Installation Checks
- Indoor unit mounted flush against the wall without tilting.
- Outdoor unit secured to an approved, reinforced bracket.
- Two-nut copper pipe flares torqued to manufacturer specifications.
- Electrical connections verified for safe power draw.
Our crews utilize professional-grade flaring tools for all copper connections. A secure two-nut flare, torqued to exact manufacturer specifications, prevents slow gas leaks.
Step 5: Copper Pipe Insulation (Critical For Tropical)
Proper installation wraps every copper line in closed-cell foam insulation to prevent the pipes from sweating in Singapore’s high humidity.
Our technicians apply self-amalgamating tape to all joints for an airtight seal. Exposed copper outside the trunking inevitably causes condensation to drip behind walls and ruin paintwork. Premium protection materials stop this issue completely. We use premium Armaflex Class 0 insulation to combat this effectively. This standard 1/2-inch thick insulation contains built-in anti-microbial properties to resist mold growth. Outdated 3/8-inch wraps fail to stop sweating in 2026 climate conditions. Our team strictly avoids these thinner wraps to ensure your walls stay dry.
What to Check
- Each copper line wrapped in closed-cell foam insulation.
- Joints sealed tightly with self-amalgamating tape.
- Outdoor-exposed sections wrapped in UV-resistant vinyl.
- No visible bare copper outside the trunking.
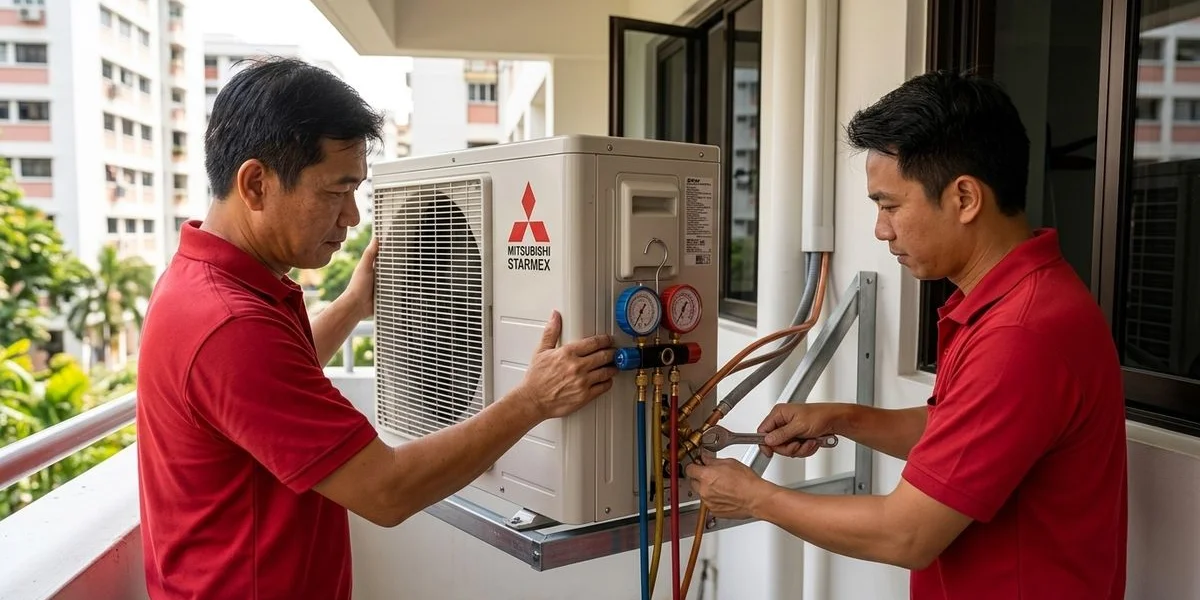
Step 6: Vacuum Test + Refrigerant Charge (45 min)
Before starting the system, technicians use a vacuum pump to remove all air and moisture from the copper lines.
Our process evacuates the system down to roughly 500 microns, creating a very low vacuum environment. This crucial step prevents moisture from mixing with R32 refrigerant. Acid formation inside the compressor ruins the internal machinery quickly. We hold the pressure steady for 20 minutes to verify there are absolutely no micro-leaks in the connections. Final verification ensures long-term cooling stability. Our installers then release the factory-charged refrigerant into the clean system.
Process Verification
- Vacuum pump connected directly to the service port.
- System pressure evacuated to 500 microns.
- Pressure level held steady for a full 20 minutes.
- Gauge readings documented and presented to the homeowner.
You should always request to see the vacuum gauge readings. Skipping this stabilization period is a common shortcut that drastically shortens equipment lifespan. We document the final pressure gauge numbers on your service sheet for future reference.
Step 7: Commissioning & Function Test (20 min)
The final technical step involves powering on the system, pairing the remote, and measuring the discharge air temperature in cool mode.
Our team verifies that the air blowing from the louvres is 10 to 12 degrees Celsius colder than the ambient room temperature. R32 systems operate at higher pressures, making this temperature delta an essential indicator of perfect health. Consistent performance across the room guarantees comfort. We check the airflow consistency across all directional vents. Technicians listen closely for any abnormal vibrations or rattling noises from the compressor. Proper drainage is non-negotiable for a healthy home.
Final Testing Steps
- Power activated and remote control successfully paired.
- Discharge air temperature measured in the lowest cool setting.
- System run for 15 minutes to verify continuous drainage.
- Outdoor drain checked for proper water dripping.
Our testing protocol runs the system for 15 minutes continuously to ensure condensation flows freely. Visual confirmation ensures water drips correctly from the outdoor drain pipe.
Step 8: Handover (15 min)
The installer provides a complete walkthrough of the remote control features, demonstrates filter cleaning, and activates your warranty.
Our handover process includes a clear recommendation for quarterly servicing schedules to maintain peak efficiency. Standard consumer protection in Singapore usually includes a 1-year warranty on parts and a 5-year warranty on the compressor. Proper documentation secures these benefits for the long run. We provide a written invoice containing all unit serial numbers and specific coverage terms. Administrative tasks shouldn’t delay your comfort. Our office registers the equipment directly with the manufacturer on your behalf.
What You Sign Off On
- Final installation completion and cosmetic checks.
- Official warranty start date confirmation.
- Any minor defects noted during the walkthrough.
- Receipt of the written invoice and serial numbers.
You complete the process by signing the final paperwork. This signature confirms the installation completion and marks the official warranty start date.
Total Time
The project timeline depends heavily on your specific hardware configuration and property layout.
Our scheduling team coordinates these hours to fit your daily routine. Exact requirements vary based on the piping route.
| Configuration | Typical Duration |
|---|---|
| Single split, new install | 4 to 6 hours |
| Single split, replacement (piping exists) | 2 to 3 hours |
| Multi-split (1 outdoor, 2 indoor) | 1 full day |
| Multi-split (1 outdoor, 3 to 4 indoor) | 1.5 to 2 days |
| Cassette with false ceiling work | 2 days |
What You Need To Do
Your physical involvement is minimal, requiring presence only during the initial survey, the start of work, and the final handover.
Our crews handle all heavy lifting and technical configurations while you go about your day. Most customers work from home while the technicians operate in designated zones. Small interruptions are kept to an absolute minimum. We need someone available for about 15 minutes on the first morning to grant access and confirm final placements.
Your Required Availability
- Present at the site survey for 30 to 45 minutes.
- Available at the start of Day 1 for 15 minutes.
- Home during the day to answer quick layout questions.
- Present at the commissioning and handover for 15 minutes.
Common First-Day Questions
Customers frequently ask about trunking aesthetics, drilling dust, and post-installation support.
Our standard trunking comes in a clean, neutral white finish. Painted matching colors are available as an upgrade for S$80 per split system. Industrial vacuums handle the cleanup immediately. We contain drilling debris effectively using protective sheets to keep your home clean. A standard room typically requires just two to three drilled holes. Post-installation concerns receive immediate attention. Our standard package includes a comprehensive 90-day workmanship warranty.
What if I find a defect after you leave? You simply send photos via WhatsApp if you spot a defect. Fast responses ensure your system stays online. We arrange a priority fix visit within 48 hours to resolve any issues.
Book A Site Survey
Schedule your property evaluation today to get exact pricing and technical recommendations.
Our Aircon installation service provides a free survey and a fixed written quote before the actual install day. Clear documentation prevents unexpected bills. We ensure every detail is documented clearly so you face zero hidden fees.
Take the first step to efficient cooling and book your consultation now.